« Technologies numériques/Thermoformage sous vide » : différence entre les versions
| Ligne 22 : | Ligne 22 : | ||
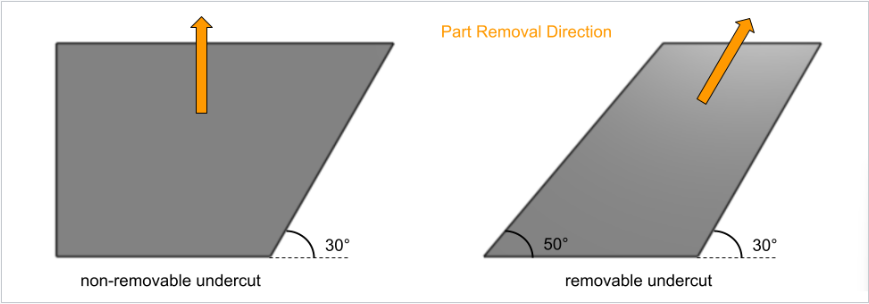
=== Contre-dépouilles === | === Contre-dépouilles === | ||
De la même manière que nous appliquons des angles de dépouille, nous évitons les contre-dépouilles pour éviter que notre moule soit coincé. Une bonne façon de les éviter serait de vous demander si votre pièce 3D aurait besoin de supports. Si c'est le cas, il y a de fortes chances que votre moule reste coincé dans votre pièce formée sous vide. | De la même manière que nous appliquons des angles de dépouille, nous évitons les contre-dépouilles pour éviter que notre moule soit coincé. Une bonne façon de les éviter serait de vous demander si votre pièce 3D aurait besoin de supports. Si c'est le cas, il y a de fortes chances que votre moule reste coincé dans votre pièce formée sous vide. | ||
[[File:Contre-dépouilles.png|center|thumb|577x577px|Comparaison entre un contre-dépouille non-amovible (à gauche) et un contre-dépouille amovible(à droite)]] | [[File:Contre-dépouilles.png|center|thumb|577x577px|Comparaison entre un contre-dépouille non-amovible (à gauche) et un contre-dépouille amovible(à droite)|lien=Special:FilePath/Contre-dépouilles.png]] | ||
=== | === Profondeurs possibles === | ||
Une feuille de plastique n'a seulement une certaine quantité de matériau disponible pour former un moule. Il y a une limite à la quantité qu'un matériau est capable de dessiner. There is a limit to the amount a material is capable to draw.Il y a des formules et des consignes disponibles pour déterminer cette limite. . When it comes to cavities, the maximum depth should not exceed 75% of the opening.------------------- | |||
[[File:Depth.png|center|thumb|456x456px|Demonstration of reachable depths]] | [[File:Depth.png|center|thumb|456x456px|Demonstration of reachable depths]] | ||
Version du 29 août 2024 à 13:43
Le thermoformage sous vide est un procédé de fabrication, utilisé pour donner forme à une feuille de plastique chaude, autour d'un moule en employant la force du vide. Le plus grand avantage s'agit d'une production rapide des pièces, avec un post-traitement minimal.Il existe différentes méthodes de thermoformage.
Le moule, aussi appelé l'outil peut être mâle ou femelle. Les outils mâles sont utilisés si on cherche de la précision à l'intérieur de la piéce.
Les outils femelles, souvent employés avec des bouchons, sont utilisés pour une précision à l'extérieur de la pièce.La plupart des moules industriels sont usinés à partir de blocs métalliques, tel que l'aluminium.
Néanmoins, l’utilisation de moules usinés peut s’avérer coûteuse car ils sont difficiles à fabriquer et nécessitent un long délai de mise en oeuvre. Si l’outil doit être remplacé ou modifié, cela peut créer beaucoup de temps d’arrêt. C’est là où les moules imprimés en 3D seront utiles. Ils ne sont pas aussi durables que les moules usinés, mais sont idéaux pour un prototypage rapide. Le problème avec les moules imprimés en 3D c'est que le filament s'agit aussi d'un thermoplastique qui fond sous l’effet de la chaleur.
Alors, comment conserver l’intégrité de votre moule lorsqu’il entre en contact avec une feuille de plastique très chaude ?
C'est ce que nous aborderons dans ce document; comment préparer vos moules pour qu'ils fonctionnent le mieux possible pendant le processus de thermoformage sous vide.
La modélisation 3D de votre moule
Pour réssir au thermoformage, il faut commencer bien avant qu'on utilise la machine.Un bon moule est la fondation d'une bonne pièce, avec des petites complications en cours de route.
Angles de dépouille
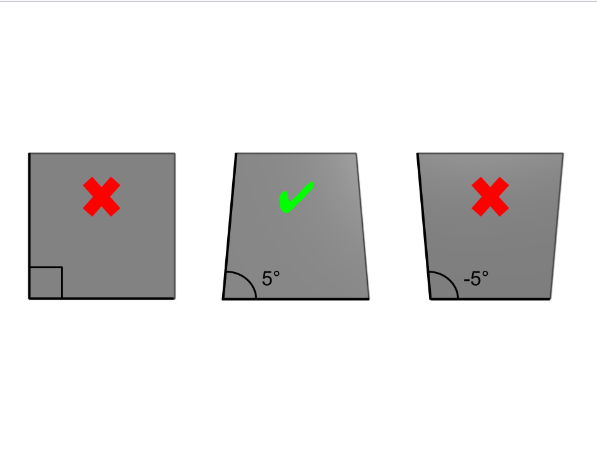
Lors du formage sous vide de votre pièce, vous voudriez éviter que votre moule ne reste coincé dedans. Pour échapper à ce problème, nous appliquons des angles de dépouille sur tous les côtés du modèle 3D, afin de faciliter le démoulage du moule. L'angle recommandé est de 5° à 7° pour les moules mâles et de 2° à 3° pour les moules femelles.
Contre-dépouilles
De la même manière que nous appliquons des angles de dépouille, nous évitons les contre-dépouilles pour éviter que notre moule soit coincé. Une bonne façon de les éviter serait de vous demander si votre pièce 3D aurait besoin de supports. Si c'est le cas, il y a de fortes chances que votre moule reste coincé dans votre pièce formée sous vide.
Profondeurs possibles
Une feuille de plastique n'a seulement une certaine quantité de matériau disponible pour former un moule. Il y a une limite à la quantité qu'un matériau est capable de dessiner. There is a limit to the amount a material is capable to draw.Il y a des formules et des consignes disponibles pour déterminer cette limite. . When it comes to cavities, the maximum depth should not exceed 75% of the opening.-------------------

Draw Ratio
Similarly as cavities, there is a maximum height you can have with your mold for a given sheet thickness. If you want your wall thickness of your final part to be a certain thickness, then you will use the draw ratio to find out which sheet thickness is best suited for your project. Here are the steps to calculate the draw ratio:
- Step 1: Calculate the surface area.
Using a CAD modeling software, you can easily get the surface area of your mold. If you do not have the exact number, you can approximate it by taking general measurements and assuming it as a simple geometry.
-Step 2: Calculate the footprint.
The footprint is the heated area of the plastic sheet and can be easily found if you know the dimensions of your machine.
-Step 3: Calculate the draw ratio.
To find the draw ratio, divide the surface area by the footprint.
Whichever number you end up with, you can multiply it by the desired wall thickness to find the starting gauge of your plastic sheet.
Edges / Fillets
Whenever you create a part for vacuum forming, you want to avoid sharp edges or sharp angles as much as possible. The thicker your plastic is, the less capable it will be to take the shape of those sharp corners. The thinner the material is, the more susceptible it is to overstretching.
.png)
Air Holes
For the plastic sheet to be able to take the shape of your mold, air needs to be able to escape from between them. To help achieve so, we implement air holes at strategically placed locations. In general, these locations imply any area that is lower than it's surrounding such as cavities, where an air pocket can easily be formed. Air holes should be spaced at least 25mm apart and their diameter should be around 1mm for sheets up to 2mm in thickness and 1.5mm diameter for materials above 2mm in thickness. Materials under 1mm in thickness may require 0.75mm holes, such as polypropylene that will tend to seek out any holes or gaps in tooling.

It is ok to add air holes directly in your 3D model but it will increase print time unnecessarily. It is recommended instead to drill the holes manually with the correct drill bit size and protective gear. You can visit the VAQUFORM page where they talk more in depth about air holes.
Paramètres d'impression
Une fois que votre modèle 3D est complète, il est temps de l'imprimer. C'est ce stade où les paramètres de votre découpeuse et le choix de filament contribueraient le plus à la durabilité de votre moule. Visitez la page web VAQUFORM (en anglais) pour une explication détaillée sur comment faire vos impressions.
Santé et Sécurité avec le thermoformage
Vacuum forming is a generally safe machine that takes little effort to manufacture parts with great quality. Although, there still are safety aspects to take into consideration. When you encounter a problem with the machine, it is important to alert the staff about it and DO NOT attempt to fix it yourself. Reparations and changes to the machine should only be made by qualified personnel.
Brûlures
Evidently, the vacuum form machine uses heat reaching up to 300°C to soften the plastic. Consequently, some parts of the machine can get very very hot. It is important to know which those are and keep body parts clear of these area. The plastic part will also be very hot after forming. You should let it cool down before attempting to handle it. If you must handle the part immediately after forming, wear the proper PPE such as heat protective gloves. To test to see if the part is still hot, approach it gently with the back of your hand. If you can feel the heat without touching it, it is probably too hot to handle. If you cannot feel any heat from a distance, try and get closer until you can touch it rapidly without feeling excessive heat. From there it should be safe to touch the part without getting burned instantly and gauge if you can handle it or not.
Fumées toxiques
It is important to keep in mind that melting a plastic emits toxic fumes. Although a vacuum form machine doesn't completely melt plastics, it does bring it past it's glass transition temperature, where polymer chains are allowed to move some encounter thermal decomposition. "During thermal decomposition, polymers breakdown into hazardous plastic fumes, fatty acids, and the original manufacturing compounds."[1] Material choice is important not only for your project, but also the safety of the people working int the same space. Have your material approved by staff before using it. Do not leave heaters unattended and do not overheat plastic sheets! Doing so will increase the risk of releasing toxic fume.
Pincement
There is a risk of pinching when operating the vacuum form machine. Use caution when using the clamp frame to ensure fingers or hands will not get trapped. This is a single person operating machine. Use caution when someone else is around. The heaters also operate on rollers and track. You should not be putting your hands onto the track as it creates another risk of pinching.