Gravure laser rotative
Dès fois, il est possible que vous ayez envie de graver des objets qui ne sont pas plats et il n'y a pas de mal.
Le graveur laser Epilog dispose d'un accessoire qui vous permet de faire de telles projets. L'outil est équipé de rouleaux motorisés qui font tourner votre pièce (par exemple: une bouteille d'eau) pour vous permettre de graver tout autour d'elle. Le Makerspace de l'Université d'Ottawa est parfaitement équipé pour réaliser ce type de gravure. Dans ce document, nous vous présenterons les étapes et les procédures à entreprendre pour vous aider à mener à bien votre projet de gravure rotative.
Configuration de l'outil
Pour utiliser l'outil de gravure rotative, suivez ces étapes simples.
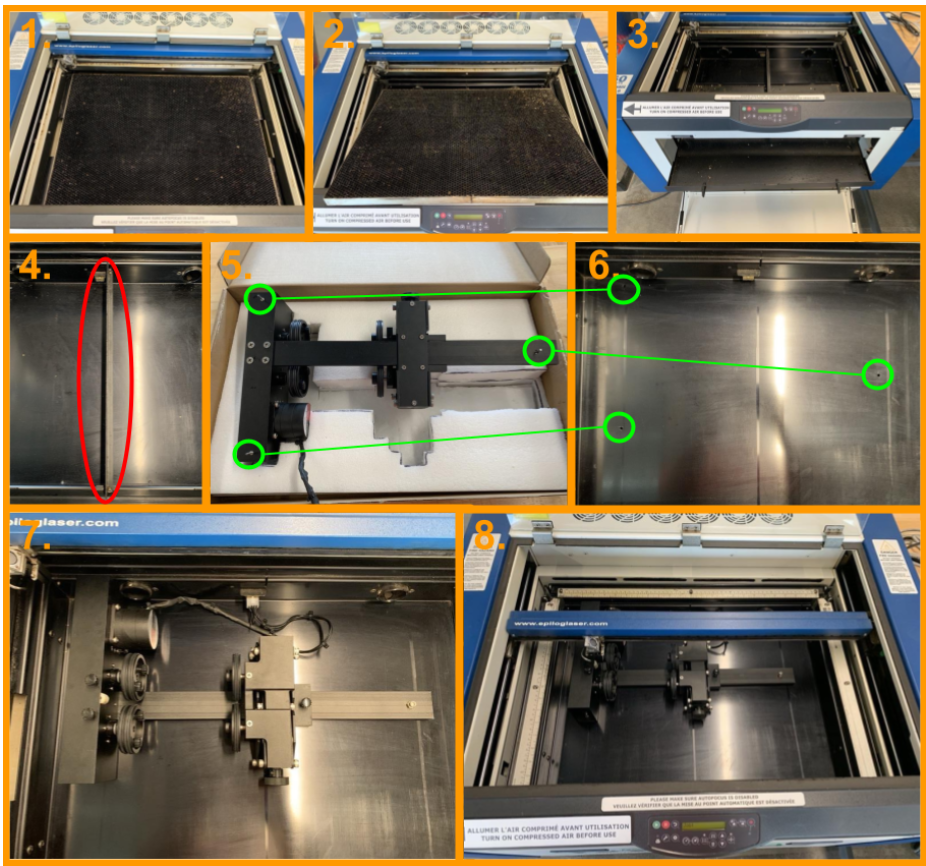
- Soulevez les règles
- Soulevez le lit pour le retirer.Le lit n'est pas lourd mais si vous trouvez que vous avez du mal à le retirer, il y a probablement une obstruction sur la voie. Demandez un membre du personnel, au Makerspace, de vous aider si possible.
- Retirez le tiroir à miettes en ouvrant la porte magnétique en avant de la découpe au laser et en le faisant glisser vers l'extérieur.
- Retirez la barre transversale.
- Il y a des broches au-dessous de l'outil et aussi une connexion enfichable pour connecter au laser.
- Vous devriez trouver trois trous en bas dans lesquels les broches d'outils sont insérées et la connexion enfichable devrait maintenant être exposée.
- L'outil est maintenant prêt à être inséré dans la machine. Alignez tout simplement les trous avec les broches et connectez l'outil à la machine.
- Une fois que vous avez configurer l'outil, baissez les règles afin qu'il n' y aucun interférences avec la tête de la découpe au laser. À présent, allumez la découpe au laser Epilog et la machine se positionnera automatiquement.Si votre machine était déjà allumée, re-éteignez et rallumez.Il ne peut reconnaître l'outil de gravure rotative qu'au démarrage.
**Vous devez aussi éteindre la découpe au laser Epilog avant de démonter l'outil de gravure rotative.
Setting Up the Part
Now that you have your tool ready, the next step is to get the part to fit properly on the tool for good results.
Roller Positioning
The right hand roller can be repositioned to adapt to the length of your part. You want to choose a position that optimizes a flat top surface, a smooth rolling surface, and good balance.

Top Surface Leveling
If you have a conic part, you still need to have a flat top surface. To get the perfectly flat top surface, you will have to manually level the bed to the highest point of your part, which should be the left side. Then, while keeping your focusing tool on, you can move the laser to the right hand side and adjust the roller height until the part touches the focusing tool. Go back to the left hand side to make sure your focus didn't change and you should now have a good leveling. You can repeat the steps if you are not satisfied. You can also use a bubble level to check if the top surface has the same level as the gantry.

Tubing and Light Parts
Lighter parts, such as tubes, tend to slip on the rollers due to lower friction. If possible add weight to your part (i.e. add water to a water bottle). If adding weight is not a option, you can use the attachment for tubing. It will clamp down the part onto the rollers to minimize slippage.

Part Position
You want your part to be sitting against the plastic bumper on the left side of the tool. The rollers are made intentionally so that it pushes the part against that small plastic bumper to minimize lateral movement. Additionally, to avoid having the part moving while engraving, you want to do a Top-Down engraving. If you do a Bottom-Up engraving the part will move away that plastic bumper and warp your engraving.

Setting Home Point

When using this tool, the Epilog laser is pre-programmed to a set y coordinate, the only coordinate you can change is the x axis home point. To set home point, use the usual button combination on the control panel of X/Y Off (5.) → Go (1.) to disengage the gantry and then Set Home (4.) when the desired location is set. It is ok if you accidentally change the y position while setting your home point, the laser will not take the change into consideration.
Focusing
Focusing the laser works the same as usual. Do not use the Auto Focus feature on the Epilog laser in the Makerspace. Doing so will cause the bed to crash into the laser head. Use the manual focus by pressing the Focus (7.) button on the control panel, then add the focus tool to the laser head and use the up and down arrows (8.) so that the tip of the focus tool barely touches your part.

Paramètres de gravure
You should base yourself off the recommended settings from your laser according to the user manual for specific materials. You can use higher or lower power to adjust the depth of the engraving or do multiple passes. While it is possible to cut with the rotary engraving attachment it is not as simple. You will have to find the perfect settings for your material to avoid the laser going through the top and burn the bottom side of the part while still cutting through. When the unfocused laser hits the bottom section, large flames can occur which can burn your material. In case of flames, lift the top glass which will stop the Epilog laser.
Configuration de votre fichier
Your file setup will be the same as per usual engraving projects. The only consideration you should keep in mind is the orientation and size. The laser is not going to fit your design automatically to the part. Per example a 20cm heigh design on a 10cm circumference part will engrave it twice over.
Your design will be facing the same way on the machine as it is on your screen. Since your part is setup sideways, the height of your part becomes the width of your design and the width of your part (circumference) becomes the height of your design. For a 360° engraving job, you will have to measure the circumference of your part and set as the height of your file. The home point is still the top left corner of your file. This is something to consider when setting up the home point on the laser, as it will go from left to right unless you modify settings.
.png)
Référence au didacticiel externe
Vous pouvez regarder cette vidéo très instructive d'Epilog pour une démonstration visuelle sur comment configurer et graver avec l'accessoire rotatif.Epilog propose également un manuel d'instructions PDF détaillé si vous avez des questions.
N'hésitez pas à poser des questions à notre équipe au Makerspace!